
16 min read ·
Identify Your Mercedes Key, Fit the Right Battery, and Get the Remote Working Again
For the documented round-button procedure, you'll fit two CR2025 cells in a sliding tray. Match the casing, panic button and access method before opening.
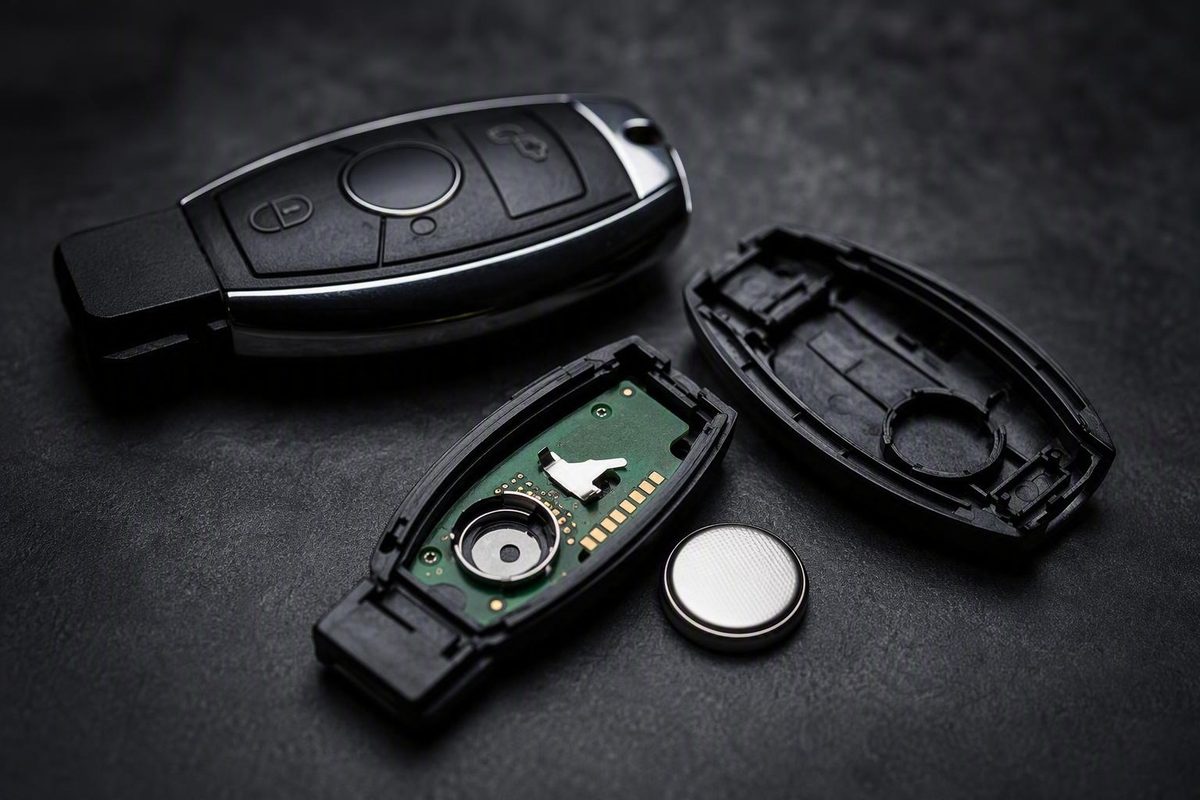
Identify your Mercedes key, fit the right battery, and get the remote working again.
Learning how to replace the battery in a Mercedes key fob is usually manageable, but there is no single procedure for every Mercedes key. Fobs described as “SmartKey” or “Chrome SmartKey” can differ in battery type, battery count, release-tab position, and whether access is through a sliding tray or removable cover.
This guide therefore covers three dealership-documented examples, not every Mercedes fob ever produced. Use a procedure only when the physical key in your hand matches its complete description. If the design is different—or appears to have a replacement housing—consult the owner’s manual, markings on the fob, or documentation tied to a verified key part number.
The examples below come primarily from dealership guidance and should not override model-specific documentation.
Before You Open the Fob: Identify the Design and Battery
Start with the key, not the vehicle’s model year. Dealership guides use labels such as “older SmartKey,” “Chrome Key,” and “newer SmartKey,” but those categories are not consistent enough to identify every battery or opening method.
Check these visible features:
- Casing: Is it predominantly black plastic, or does it have prominent chrome or silver-colored trim?
- Panic button: Is the red button round or triangular?
- Release tab: Is the tab black or silver, and is it at the end, bottom, side, or rear?
- Mechanical key: Does a concealed metal key slide out after the tab is operated?
- Battery access: Does the fob appear to have a sliding end tray or a removable back cover?
- Release point: Can you identify a deliberate slot or latch inside the mechanical-key opening?
- Markings: Is a key part number or battery designation printed on the case?
The three configurations covered here are:
| Documented configuration | Identifying features | Access method | Documented battery example |
|---|---|---|---|
| Older black-plastic SmartKey | Black plastic body, concealed mechanical key, horizontal internal release | Battery compartment or tray | Two CR2025 cells in the matching dealership example |
| Round-button Chrome Key | Chrome trim, round red panic button, black release tab | Sliding battery tray released from the opposite end | Two CR2025 cells |
| Triangular-button Chrome Key | Chrome trim, triangular red panic button, narrow release opening | Removable back cover | One CR2025 cell |
These quantities are appearance-specific examples, not universal Mercedes specifications. The round-button Chrome Key, triangular-button Chrome Key, and SmartKey configurations above are documented respectively with two CR2025 cells, one CR2025 cell, and two CR2025 cells by Mercedes-Benz of Canton.
Other dealership guidance reports one CR2032 in certain newer Chrome SmartKeys, while associating one or two CR2025 cells with other fobs. The same guidance qualifies its year ranges, so vehicle age should not be the sole compatibility test. Mercedes-Benz of Fresno documents those differing battery examples.
Use this verification sequence before buying a battery:
- Match the fob’s casing, panic-button shape, release tab, and access method.
- Check the exterior for a battery code or key part number.
- Release the mechanical key if that can be done without opening the battery compartment.
- Open the fob only with the procedure matching all its visible features.
- Photograph the installed battery before removing it.
- Read the complete code printed on the cell.
- Count the cells and record how they are positioned.
- Corroborate the result through fob markings, the owner’s manual, or key-part documentation when available.
The installed cell is the best starting point, but it is not infallible: a previous owner or repairer could have fitted an incorrect replacement. Seek further confirmation if the cover is already bulging, the battery sits loosely, the contacts do not meet it correctly, or the installed arrangement looks improvised.
Stop condition: Do not use the “closest-looking” procedure. If you cannot match the casing, panic-button shape, release-tab location, designated opening, and tray-or-cover arrangement, stop and obtain model- or part-number-specific guidance. A perimeter seam is not necessarily an opening point.
Tools, Workspace, and Damage-Prevention Checklist
Gather the following before opening the fob:
- A verified fresh replacement coin cell or matching set
- A clean, soft cloth
- Good lighting
- A phone or camera for reference photographs
- An optional plastic pry tool
- An optional small flat-head screwdriver, but only for a documented procedure that calls for one
In most of the Mercedes dealership procedures covered here, the concealed mechanical or emergency key is the main opening tool. A screwdriver is not universally required. Using one simply because the case has a visible seam can apply force at the wrong point.
Work on a clean, well-lit table. Spread out the cloth so the mechanical key, battery, cover, or sliding tray cannot roll away or drop into a gap. Avoid opening the fob over a vehicle seat, carpet, sink, or cluttered workbench.
Before removing anything, take photographs showing:
- The complete battery code
- The visible face of the cell
- The position of its
+or−marking - The number and order of the cells
- The direction in which a tray fits
- The location of contacts, clips, and locating tabs
Do not rely on a universal “positive side up” rule. Published instructions sometimes state a polarity for the particular fob being described, but that does not establish the correct orientation for every Mercedes key.
Apply gentle, controlled pressure only at the documented release slot or latch. If the tray or cover does not move:
- Stop applying pressure.
- Recheck the fob’s identifying features.
- Confirm that the mechanical key is entering the designated opening.
- Determine whether the key should press an internal latch rather than lever the outer seam.
- Check whether the fob has a tray that withdraws in another direction.
Prefer a plastic tool near exposed electronics when practical. Generic key-fob guidance warns that excessive force can crack a case and that metal tools used near the circuit board can increase the risk of damage. It also recommends recording the original battery orientation before removal. AutoZone provides the supporting general handling guidance.
Once removed, place the old cell somewhere secure rather than leaving it loose on the work surface. Set it aside for an appropriate battery-recycling collection point; Mercedes-Benz of Birmingham likewise advises recycling used key-fob batteries appropriately. See its battery-handling guidance.
How to Replace Batteries in an Older Black-Plastic SmartKey
Use this procedure only for a black-plastic SmartKey that has:
- A concealed mechanical key
- A release latch at the end or rear
- A designated opening inside the removed-key cavity
- A battery compartment released by inserting the mechanical key horizontally
Do not use it merely because the vehicle or key looks old. Some SmartKey instructions describe a sideways latch action instead, while other Mercedes fobs use a removable back cover. Those are different configurations.
The following horizontal-release procedure and its two-CR2025 example are documented for the matching older plastic SmartKey by Mercedes-Benz of Birmingham.
-
Place the fob on the cloth. Position it so you can control both the mechanical key and the compartment as it releases.
-
Operate the rear or end latch. Hold the release in its open position.
-
Withdraw the mechanical key. Pull it straight out and set it beside the fob.
-
Locate the designated internal opening. Inspect the cavity from which the key was removed. Do not insert the key into the perimeter seam.
-
Insert the mechanical-key tip horizontally. Press gently at the documented release point until the battery compartment releases.
-
Lift or withdraw the compartment. Keep it aligned with its original path. Do not twist the compartment against the fob body or exposed electronics.
-
Photograph the installed arrangement. Record the code, number of cells, visible polarity, stacking order, and compartment direction.
-
Remove the old cells. Use the holder’s open edge or intended removal point. Avoid levering against nearby contacts.
-
Install exact replacements. The cited configuration uses two CR2025 cells, but the battery code and quantity found in your fob should be corroborated if anything appears inconsistent.
-
Reproduce the original arrangement. Match the photographs rather than applying a generic polarity rule.
-
Reinsert the compartment. Keep it level and slide it into the same channel. It should sit flush without heavy pressure.
-
Return the mechanical key. Push it fully into its original slot and confirm that the latch retains it.
Do not confuse this with a back-cover procedure. This configuration uses horizontal insertion of the mechanical key to release a battery compartment. If your fob instead has a narrow slot that releases a rear cover, do not continue with these steps.
Inspect the compartment before testing. If it sits proud, tilts to one side, or springs back out, remove it gently and check the cell seating and tray direction. Do not force it flush.
How to Replace Batteries in a Round-Button Chrome Key
This procedure applies only when all of the following are present:
- A chrome-finished casing
- A round red panic button
- A black release tab
- A removable mechanical key
- A battery tray released from the end opposite the mechanical-key opening
The documented round-button procedure uses two CR2025 cells and a sliding tray. Those specifications apply only to the visually matching fob described by Mercedes-Benz of Canton.
-
Slide the black release tab. Hold it in the release position.
-
Pull out the metal mechanical key. Place it on the cloth.
-
Find the opening at the opposite end. This is the documented tray-release point.
-
Insert the mechanical key into that opening. Apply straight, controlled pressure to release the tray. Do not twist the key along the exterior seam.
-
Withdraw the tray gently. Note which end and face were visible as it emerged.
-
Photograph the complete arrangement. Capture the battery code, both cell positions, polarity, stacking order, contacts, and tray direction.
-
Remove both old cells. Lift them from the intended open edge without dragging a metal tool across the contacts.
-
Install two matching fresh CR2025 cells. Reproduce the recorded orientation and order exactly.
-
Slide the tray back into the fob. Keep it aligned with its channel and stop if it binds.
-
Confirm that the tray sits flush. A raised or uneven end indicates that the tray or cells may not be seated correctly.
-
Return the mechanical key. Confirm that the release tab secures it.
This two-cell design is an important reason not to assume that every chrome Mercedes key contains only one battery. Chrome trim identifies the exterior finish, not the battery quantity.
If a supposed round-button key has a removable rear panel but no identifiable sliding tray, stop. It may be a different internal design or a replacement housing.
How to Replace a Battery in a Triangular-Button or Newer Chrome SmartKey
Despite the broader category in this heading, the main procedure below is limited to the documented triangular-red-button Chrome Key. Do not apply it automatically to every newer-looking Chrome SmartKey.
Proceed only if the fob has:
- A triangular red panic button
- A black release tab
- A concealed metal key
- A narrow designated release opening
- A removable back cover rather than the round-button sliding tray
The documented triangular-button configuration uses one CR2025 cell and calls for the mechanical key to release the back cover.
-
Operate the release tab. Hold it while pulling out the mechanical key.
-
Locate the narrow release opening. Use only the designated slot, not an arbitrary gap around the cover.
-
Insert the mechanical key into the narrow end. Apply gentle pressure at the intended release point.
-
Release the back cover. Remove it in its natural direction, noting which end lifts first and how the locating tabs engage.
-
Find the intended battery-removal point. The matched design may expose a notch beside the cell. Use that point rather than prying against the circuit board.
-
Photograph the cell before removal. Record its complete code and visible polarity.
-
Remove the battery carefully. The cited triangular-button procedure mentions a small flat-head screwdriver, but use it only at the intended battery notch. A fingernail or plastic tool may be preferable if the cell releases without stressing the holder.
-
Install the exact replacement. For this documented triangular-button configuration, that is one CR2025. Preserve the original orientation.
-
Align the back cover. Engage the locating tabs or fixed end in the same order in which the cover came apart.
-
Press the cover evenly into place. The seam should be consistent around the case.
-
Reinsert the mechanical key. Confirm that it is fully seated and retained.
Some other newer Chrome SmartKeys are reported to use one CR2032, so “newer Chrome” is not enough to determine the battery or opening method. Mercedes-Benz of Fresno describes that separate CR2032 example. If your key lacks the triangular panic button or matching cover-release arrangement, do not use the procedure above.
If one corner of the cover remains raised, reopen it and check the battery seating and locating tabs. Do not squeeze the case harder in an attempt to overcome misalignment.
Reassemble and Test the Key Before Declaring Success
Inspect the assembled fob before returning to the vehicle:
- Is the battery tray fully flush?
- Is the cover seam even?
- Are the clips engaged?
- Do the buttons move normally?
- Is the mechanical key fully seated?
- Is there a new gap, rattle, or distortion?
If the case will not close normally, reopen it rather than applying more force. Check that the cell is seated under the correct retaining edge, that a tray is facing the right direction, and that no clip or contact is trapped.
Test only after the battery is secured and the fob is properly assembled. Do not handle or press against an exposed circuit board.
Stand near the vehicle so distance does not become an immediate troubleshooting variable. Dealership guidance likewise recommends testing the reassembled fob close to the vehicle. Mercedes-Benz of Hoffman Estates provides that testing recommendation.
Check each relevant function:
- Lock the doors.
- Unlock the doors.
- Operate the trunk or liftgate release, if fitted.
- Test the panic button in a suitable location and be ready to cancel it.
- Check whether the vehicle recognizes the key for normal entry or starting.
- Repeat lock and unlock several times to identify intermittent operation.
- Reduced remote range
- Intermittent response
- Repeated button presses being required
- Unreliable locking or unlocking
- Remote operation improving when you move closer to the vehicle
Difficult engine starting by itself does not prove that the fob battery is weak. A general charging-system warning is also not a reliable diagnosis of a key-fob coin-cell problem. Those symptoms may concern other vehicle systems.
A successful battery change should restore a fob whose only fault was a depleted cell, but it cannot establish a universal programming rule. Mercedes configurations vary, and a failed test can also result from an installation error, physical damage, interference, or a vehicle-side fault.
If the Mercedes Key Fob Still Does Not Work
Do not immediately buy a complete replacement key or assume programming is required. Work through the installation in a fixed sequence.
1. Verify the battery code
Compare the complete designation on the replacement with your photograph of the original. Do not rely on appearance alone.
2. Verify the quantity
Confirm that every battery position is occupied. Some documented Mercedes fobs use one cell, while others use two.
3. Confirm that the battery is fresh
If its condition is uncertain, test with another verified fresh replacement or matching set.
4. Remove packaging material
5. Recheck polarity and cell order
Compare the installation with your photographs. Do not reverse a cell merely because instructions for a different fob specify another orientation.
6. Reseat the battery
Confirm that the cell lies flat, sits under the correct retaining edge, and touches the intended contacts. In a two-cell holder, verify both positions and the recorded order.
7. Inspect the contacts
Look for dirt, corrosion, displacement, or a contact that no longer reaches the battery. Do not reshape a spring contact aggressively. A visibly broken or displaced contact warrants professional inspection.
8. Check the tray or cover
A partly inserted tray or unevenly clipped cover can prevent correct seating. Confirm that all exterior pieces are flush.
9. Test near the vehicle again
Try more than one button. If lock and unlock work but one individual control does not, the problem may involve that switch rather than the battery.
10. Test a spare key
A battery cannot correct every key-fob failure. Other possible causes include:
- Worn or failed buttons
- Broken or displaced battery contacts
- Water exposure or internal corrosion
- A cracked tray, clip, or housing
- Impact or previous prying damage
- Signal interference
- A weak vehicle battery
- Vehicle-side antenna or control-module faults
Dealership troubleshooting guidance identifies water damage, interference, a weak vehicle battery, and vehicle antenna or module faults as reasons a new fob battery may not restore operation. Mercedes-Benz of Daytona Beach discusses those broader causes.
Seek professional inspection if you find:
- Visible circuit-board damage
- A broken battery contact
- A distorted holder
- A cracked tray or case
- A cover that cannot be secured
- Evidence that the fob was submerged
- Continued failure after all installation checks
- Persistent vehicle warnings associated with key recognition
Do not assume either programming extreme. Consult the owner’s manual before trying generic online button sequences.
If the fob battery is dead, the concealed mechanical key may provide emergency access through the driver’s door. The exact entry method and dead-fob backup-start procedure vary by vehicle, so follow the model-specific owner’s manual rather than assuming the fob belongs in a universal sensing location.
Finally, secure the spent cell and take it to an appropriate battery-recycling collection point.
The compact workflow is:
- Identify: Match the casing, panic-button shape, release tab, and tray or cover.
- Verify: Read the installed battery code, count the cells, and corroborate the result where possible.
- Record: Photograph the polarity, order, and tray direction.
- Replace: Use only the release procedure for that exact configuration.
- Reassemble: Seat the tray or cover evenly without force.
- Test: Check every relevant function near the vehicle.
- Escalate carefully: If installation checks do not restore operation, consult the owner’s manual or a qualified service provider rather than forcing the case or assuming programming is automatically required.
Does my Mercedes key fob use a CR2025 or CR2032 battery?
It can use either, depending on the exact fob. Documented dealership examples include one or two CR2025 cells, while certain newer Chrome SmartKeys are reported to use one CR2032. Mercedes-Benz of Hoffman Estates advises checking whether the particular fob uses CR2025 or CR2032.
Treat the installed battery code as the best starting point, not the only authority. Compare it with fob markings, the owner’s manual, or documentation tied to a verified key part number—especially if the case does not close correctly or there are signs of an earlier incorrect installation.
Does a Mercedes key fob use one battery or two?
Both arrangements exist. A documented appearance-based guide specifies two CR2025 cells for a round-red-button Chrome Key, one CR2025 for a triangular-red-button Chrome Key, and two CR2025 cells for the SmartKey configuration it covers. Those figures apply only to the matching designs, not every Mercedes key.
Confirm the quantity physically installed before buying replacements. If the fob does not match one of the documented configurations, obtain part-number- or model-specific guidance rather than inferring the count from chrome trim or vehicle age.
Which side of the key-fob battery should face up?
There is no supported universal answer for every Mercedes fob. Some dealership procedures specify positive-side-up for the exact key they describe, while broader guidance tells owners to preserve the existing orientation.
Photograph the old cell before removal and reproduce the visible polarity. If there are two cells, record their order as well. If the old arrangement is unavailable or appears incorrect, consult documentation for the specific key instead of guessing.
Does a Mercedes key need reprogramming after a battery change?
Not necessarily. First verify the battery code, quantity, freshness, polarity, seating, contacts, packaging-film removal, and case closure. A routine battery replacement addresses the fob’s power supply and does not automatically prove that programming has been lost.
However, no single rule covers every Mercedes model and key generation. If a correctly installed fresh battery does not restore recognition, consult the model-specific owner’s manual or a qualified Mercedes service provider. Physical damage, water exposure, failed switches, interference, and vehicle-side faults should also be considered.
How can I unlock my Mercedes if the key-fob battery is dead?
Release the concealed mechanical or emergency key. It may permit manual entry through the driver’s door; Mercedes-Benz of Fresno identifies the internal mechanical key as the backup method when the fob battery is dead.
Once inside, follow the vehicle’s owner’s manual for its dead-fob backup-start procedure. The sensing location and method vary, so do not assume that every Mercedes uses the same cupholder, console, or steering-column position.