
8 min read ·
Find Your Prius Battery Without Removing the Wrong Trim
Locate the Prius 12V battery by U.S. model year and variant, distinguish rear-mounted batteries from jump terminals, and check access and replacement cautions.
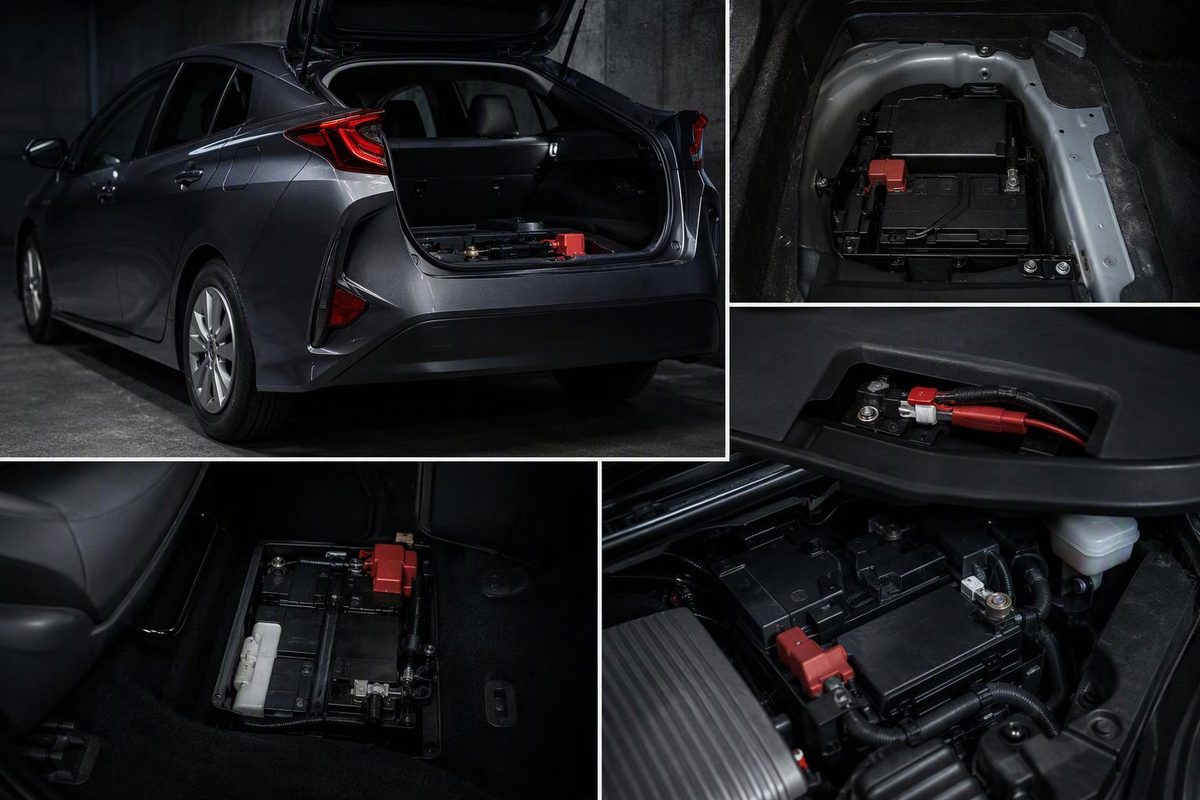
The Toyota Prius 12V battery is in the right rear cargo area on the standard 2004–2015 hatchback and under the hood on the 2016–2022 hatchback. The 2001–2003 Prius sedan has it on the left side of the trunk. Prius c, Prius v and Prius Prime need separate identification: their layouts do not all follow the standard hatchback’s generation changes.
These locations use U.S. model years. Right and left mean the vehicle’s sides when facing forward from inside the car. For a 2023 or newer Prius or Prime, use that model year’s manual rather than assuming the 2016–2022 location carries over.
Choose your Prius variant and model year to find the supported location and the next access step.
Prius 12V Location Finder
2010 Standard Prius
Right/passenger rear cargo area
For battery access, follow your manual’s right-side cargo-cover instructions. For a jump-start, use the dedicated positive terminal in the under-hood fuse box and the specified ground point.
Right and left are the vehicle’s sides facing forward. Confirm READY is off before battery work; do not touch orange high-voltage components.
Sources: Toyota Gen 1–3 emergency guides; Toyota 2012 Prius c and Prius v guides; Atomic Auto Gen 4/Prime location guide. Links and scope are in the article. Unverified years require their own manual.
Standard Prius Battery Locations From 2001–2022
The first distinction is sedan versus hatchback; the next is model year. A rear-mounted battery and an under-hood jump terminal can both belong to the same car. Seeing a positive connection under the hood therefore does not establish where the removable battery sits.
| U.S. Model | 12V Battery Location | Start Here |
|---|---|---|
| 2001–2003 Prius sedan | Left/driver side of trunk | Open the trunk. |
| 2004–2009 Prius hatchback, Gen 2 | Right/passenger rear cargo area | Inspect right-side cargo trim. |
| 2010–2015 Prius hatchback, Gen 3 | Right/passenger rear cargo area | Follow cargo-cover access instructions. |
| 2016–2022 Prius hatchback, Gen 4 | Engine compartment | Open the hood. |
2001–2003 Sedan: Left Side Of The Trunk
Toyota’s first-generation Prius guide identifies the auxiliary battery on the left side of the trunk. This is the driver’s side on the U.S. cars covered here.
Do not use the right-rear instructions for a later hatchback when looking at this sedan. Open the trunk and identify the left-side battery area before removing trim. The location tells you where to begin; it does not provide the sequence for removing covers, releasing the hold-down or disconnecting the battery.
2004–2009 Hatchback: Right Rear Cargo Area
The Gen 2 Prius keeps its 12V battery in the right/passenger side of the rear cargo area, as shown in Toyota’s second-generation guide. Look behind the right-side cargo trim rather than searching the engine compartment for the battery itself.
If you opened the hood because the vehicle needs a jump-start, you may already be in the correct place for that task. The dedicated positive jump terminal is under the hood even though the battery is at the rear. For replacement or direct inspection of the battery case, return to the right rear cargo area and use the model-specific access instructions.
2010–2015 Hatchback: Right Rear Cargo Area
The Gen 3 hatchback also places its auxiliary battery in the right/passenger rear cargo area. Toyota’s third-generation guide confirms that location.
The shared location does not make the Gen 2 and Gen 3 removal procedures interchangeable. Begin at the right rear, then follow the instructions for your own year’s cargo covers and battery access. Do not pull apart unrelated panels simply because the battery is not visible with the hatch open.
For these cars, separate the task into two decisions: whether you need the battery itself, and which covers the manual says to remove. A jump-start generally directs you to the specified under-hood connection points, not to a full rear-battery removal procedure.
2016–2022 Hatchback: Under The Hood
The standard Gen 4 Prius hatchback moves the 12V battery to the engine compartment. The generation-specific location and jump-start guide identifies the under-hood layout for 2016–2022.
Open the hood and identify the actual battery before planning removal. A fuse-box connection or positive terminal is not, by itself, the battery. For replacement, you need access to the battery case, its connections and its retaining hardware—not merely a point where a jump lead can connect.
This range ends at 2022. It is not evidence that a 2023 or newer hatchback has the same location or access procedure. The later car’s own manual is the appropriate reference.
Prius c, Prius v And Prime Need Their Own Layout
The letters after “Prius” change which location instructions apply. A Prius v wagon should not be treated as a standard hatchback of the same year, and a Prius c should not be searched using either hatchback layout.
The Toyota emergency guides cited below establish the layouts for the models they describe. Their publication year is not proof of identical access arrangements for every year carrying that model name. The location finder therefore distinguishes a supported year from a layout that still needs confirmation in your manual.
Prius c: Passenger-Side Rear Seat In Toyota’s 2012 Guide
Toyota’s 2012 Prius c emergency guide places the 12V battery under the passenger-side rear seat. Begin with that model’s rear-seat access instructions, not with the standard Prius’s cargo-area instructions.
The high-voltage battery is also under the rear seat. That makes positive identification especially important: “under the seat” is not enough to distinguish the auxiliary battery from the hybrid system. Do not touch orange high-voltage cables or open high-voltage components while looking for the 12V battery.
For a Prius c of another model year, confirm the location and access steps in that year’s manual. The cited 2012 guide supplies a specific layout reference, not a universal removal procedure for every Prius c.
Prius v: Right Rear Cargo Area In Toyota’s 2012 Guide
Toyota’s 2012 Prius v guide puts the 12V battery in the right/passenger side of the cargo area. The starting point is therefore the rear of the wagon, not the standard Gen 4 hatchback’s engine-compartment location.
The wagon’s model name matters more than a hatchback generation label. If your vehicle is a Prius v, use Prius v documentation for the access covers and removal sequence. For years other than the cited 2012 model, confirm the layout rather than treating that guide as proof for the entire production run.
2017–2022 Prius Prime: Under The Hood
The 2017–2022 Prius Prime has its 12V battery under the hood, according to the shop guide covering Gen 4 and Prime. Use the Prime’s own manual to identify its battery access and the specified jump-start connections.
An earlier Prius Plug-in is not covered by this Prime range. Nor does the range establish the layout of a later Prius Plug-in Hybrid. If the paperwork or vehicle identification says Plug-in rather than the covered Prime model, select that variant’s manual before removing anything.
A Jump Terminal Is Not The Battery Location
On the 2004–2015 standard Prius hatchback, the battery is at the rear but the dedicated positive jump terminal is inside the under-hood fuse box. The generation-specific jump-point guide distinguishes those two locations. You do not need to uncover the rear battery merely to jump-start the car.
That distinction changes where you work. If the immediate goal is a jump-start, find the manual’s specified positive connection and illustrated ground point. If the goal is replacement, inspection of the battery case or work on its retaining hardware, find the actual battery using the year-and-model location above.
Do not improvise a ground point from a location description. “Right rear cargo area” identifies where the battery sits; it is not an instruction to attach jump leads anywhere nearby. The model-specific jump-start illustration supplies the connection points.
Keep clear of orange high-voltage cables and components. They are not part of a 12V jump-start. The auxiliary-battery task does not require opening the high-voltage battery or disturbing its wiring.
A dead 12V battery can also make getting into the vehicle the first obstacle. If the doors will not unlock electrically, use Toyota access when the 12V battery dies before attempting to reach a rear-mounted battery. Do not start cargo-trim removal until you have identified both the vehicle variant and the task you need to perform.
Confirm READY Is Off Before Battery Work
Switch the vehicle fully off and confirm that READY is off before disconnecting the auxiliary battery. A silent engine does not establish that the hybrid system is shut down. Toyota’s safety guidance also warns against touching, cutting or opening high-voltage cables and components.
This distinction matters when you have located the battery and are about to begin work. Finding the correct compartment is not permission to disconnect terminals immediately. Obtain the model-specific removal and reconnection procedure first, including the instructions for any covers, hold-down and vent connection.
The emergency guides are useful for identifying battery locations and high-voltage hazards. They do not replace an owner’s or service manual procedure for routine battery replacement. If your access arrangement does not match the guide, stop and verify the model and year instead of extending the instructions to nearby components.
Location Does Not Establish Replacement Fitment
Before buying a replacement, verify the exact year and variant, battery technology, case dimensions, terminal layout, hold-down and any required vent connection. Two batteries being called “12V” does not establish that their cases, connections or installation requirements match your Prius.
A cargo-area location also should not be used as a shortcut for selecting a battery. Identify the specified replacement for the vehicle, then check how it is retained and vented. The location table contains no battery size, capacity or part-number figures, so it cannot support a purchase by itself.
Venting is particularly relevant to cabin-mounted installations. Toyota’s 2023 Prius battery precautions and replacement instructions require the replacement battery’s exhaust hose and exhaust-hole plug to be securely attached. That manual warns that incorrect installation can allow hydrogen into the cabin and create an ignition or explosion risk. It also calls for safety glasses when handling the battery.
Those are requirements from the cited 2023 Prius manual, not a substitute procedure for every older Prius, Prius c, Prius v or Prime. Use your own model’s instructions to determine whether a vent connection is required and how it must be installed. Do not transfer the 2023 instructions to another vehicle solely because both batteries are auxiliary batteries.
If a shop is doing the replacement, ask the quote to include fitment verification, vent reconnection where required and any specified post-installation checks—not just the battery. This location reference supplies no replacement price or labor-time figure. Its purpose is to get you to the correct battery or jump-start access point without confusing a different Prius layout for your own.